HP Systems Insight
Manager (HP SIM) is the foundation for HP's unified server-storage
management strategy. It provides simplified, centralized management
of multiple servers and platforms through a web-based, unified (“single-pane-of-glass”) interface. HP SIM provides the basic
tools needed to identify, discover, monitor, and deploy systems and
other assets on the network. The core HP SIM software uses WBEM to
deliver essential capabilities required to manage HP server platforms.
HP SIM running on a Microsoft Windows
ProLiant server supports provisioning of OpenVMS on selected HP Integrity
rack and blade servers. For information on prerequisites
for HP SIM, see “Prerequisites for HP SIM Provisioning”. An OpenVMS provisioning plug-in for HP SIM must be installed on
the ProLiant server. You can access HP SIM from a browser on your
PC. With provisioning support, HP SIM installs or upgrades OpenVMS
quickly and easily on one or more servers in the network, in much
the same way as HP-UX supports provisioning. You can also use provisioning
support to apply OpenVMS licenses (Product Authorization Keys) and
to configure OpenVMS TCP/IP on one or more servers in the network
simultaneously.
You use HP SIM to initiate the provisioning, after
which the installation, upgrade or configuration process occurs automatically
in the background. To install or upgrade OpenVMS over the network
with HP SIM provisioning, you can use network services provided by
the InfoServer utility and TCP/IP services for OpenVMS, or you can
use the vMedia feature provided with your Integrity server firmware.
Currently, HP SIM provisioning does not support booting from a shadowed
system disk.
To use the InfoServer software utility, you must
create a service for a bootable image of OpenVMS (a container file)
stored at a location on the network that is accessible to the InfoServer.
The OpenVMS InfoServer utility serves for provisioning in much the
same way as does the HP Ignite-UX server for provisioning HP-UX on
Integrity servers. Using HP SIM with InfoServer, you can provision
up to eight servers simultaneously.
To use vMedia, which is provided with Integrity servers
that include iLO 2 MP, you must create an ISO image of the OpenVMS
OE DVD, store the image on an accessible PC or Windows server in the
network, and use HP SIM to connect your Integrity servers vMedia to
that image. Using vMedia, you can provision one server at a time.
You can also use vMedia independently of HP SIM to install or upgrade
a server over the network. For more information about vMedia, see Section D.2.
NOTE: DVDs are accessible by vMedia as read-only.
D.1.2 Prerequisites for HP SIM Provisioning
Support of OpenVMS
Provisioning using HP SIM Version 4.0 requires the following:
HP SIM Version 6.0, running
on a Microsoft Windows ProLiant server (32-bit), designated as the
management workstation.
The ProLiant server must be on
the same LAN as any Integrity servers that you plan to provision.
To provision OpenVMS, HP SIM requires that the OpenVMS Provisioning
Plug-in for HP SIM be installed. This plug-in enables HP SIM to manage
and provision OpenVMS. For information on acquiring and installing
the plug-in, see “Setting Up HP SIM and the Windows Server to Provision OpenVMS”. For information on installing, configuring,
and using HP SIM, see the documentation located at the following website:
NOTE: When OpenVMS is installed by means of HP SIM provisioning,
the WBEM Services for OpenVMS, and WBEM Providers for OpenVMS are
installed automatically. These products along with TCP/IP Services
for OpenVMS are required for HP SIM management support.
A LAN connection to the
iLO 2 MP port of each Integrity server that you plan to provision.
You can use HP SIM provisioning
for the following Integrity servers: rx3600, rx6600, and the HP Integrity
BL860c and BL870c Blade servers.
IMPORTANT: Provisioning Version 4.0 does not support installing, upgrading
or configuring OpenVMS as a guest operating system on HP Integrity
VM.
Verify that the version of OpenVMS being provisioned
is supported on the target Integrity server. For more information
on supported Integrity servers, see the following documents:
OpenVMS Hardware Support Chart available at the following location:
If you plan to use the
InfoServer utility to provide HP SIM provisioning, the InfoServer
utility must be running on an OpenVMS Version 8.4 system connected
to the same LAN as your Integrity server. You must provide the IP
address of your InfoServer to HP SIM provisioning for installing or
upgrading OpenVMS. For information on setting up the InfoServer for
HP SIM provisioning, see “Setting Up InfoServer Support”.
If you plan to use vMedia,
the following are required:
On the Integrity server:
vMedia licensing through
the Advanced Server Management option (iLO 2 Advanced Pack) and the
user virtual media access right. vMedia is part of the iLO Advanced
Pack feature set. This license is provided and pre-enabled on the
Integrity BL860c and BL870c Server Blade products.
On the management workstation
(or a Windows-based PC/server on the same LAN as the Integrity server):
Microsoft Internet Explorer
Version 6 or later.
Java Plug-in 1.5.0_08
or later. (The vMedia Java applet has only been tested on x86 PCs
and Windows servers.)
An ISO image of the OpenVMS
Integrity servers OE DVD stored on a local disk or a network drive
accessible through a high-speed link. To create the ISO image, you
can use ILO 2 MP through your browser, as described in “Setting Up vMedia”. HP recommends
that you do not use vMedia to install or upgrade directly from a DVD
on the management workstation.
NOTE: When using vMedia to install or upgrade OpenVMS,
HP recommends that you use an image of the OpenVMS Integrity servers
OE DVD located on your Windows-based management station. This has
two advantages:
If the DVD is defective or corrupted, when you attempt
to create an image of it, the imaging software will fail, thereby
indicating the DVD's condition.
Installing or upgrading OpenVMS from the image file
is much faster than installing from a DVD. This advantage outweighs
any extra cost or time of copying the DVD to the ISO image file.
If your Integrity server has a local DVD drive,
install or upgrade from the OpenVMS for Integrity servers OE DVD inserted
in the DVD drive on your Integrity server instead of using vMedia
from your Windows-based management workstation. In short, for best
performance with installations or upgrades, choose from the following,
listed according to the potential speed (from fastest to slowest):
Use local DVD drive —
If your Integrity server has a local DVD drive, install or upgrade
using the OpenVMS for Integrity servers OE DVD from that DVD drive.
Use vMedia with OpenVMS
OE DVD ISO image — To install or upgrade using an ISO image
of the OpenVMS for Integrity servers OE DVD, where the image is stored
on your Windows-based management workstation.
vMedia with OpenVMS OE
DVD — It is a slow process, and is not recommended unless you
have no other recourse. Install or upgrade from a DVD drive on your
Windows-based management workstation.
To set up your environment for vMedia support,
see Section D.1.4.
Up-to-date firmware for
the Integrity server (on server blades, this includes the firmware
for the Onboard Administrator).
Optionally, HP iLO or
other means for monitoring the console.
D.1.3 Setting Up InfoServer Support
If you want to use the InfoServer utility to provide a network service
for provisioning, follow the steps described in this section. To use
the InfoServer utility to enable provisioning over the network, the
utility must be running on an OpenVMS Alpha or OpenVMS Integrity server
system in the same LAN as the target Integrity server that is to be
provisioned. The InfoServer utility uses the TCP/IP Services for OpenVMS
(BOOTP server and TFTP servers) to help boot the OpenVMS operating
system. The InfoServer accesses a bootable image of OpenVMS that you
store on a system in the same LAN. Follow these steps to enable the
required InfoServer support for HP SIM provisioning. For more information,
see Appendix C.
At least one system in the
LAN must be designated as the InfoServer server. This is the system
that hosts the DVD drive from which network booting is performed.
To deploy OpenVMS Version 8.4, the InfoServer server must be running
OpenVMS Integrity Version 8.4 or later. Perform these basic steps
to set up InfoServer:
Copy the SYS$STARTUP:ESS$LAD_STARTUP.TEMPLATE
file to the SYS$STARTUP:ESS$LAD_STARTUP.DAT file. If any changes are
necessary for your environment (typically none are required), modify
the SYS$STARTUP:ESS$LAD_STARTUP.DAT file.
Copy the SYS$STARTUP:ESS$LAST_STARTUP.TEMPLATE
file to the SYS$STARTUP:ESS$LAST_STARTUP.DAT file. Modify the SYS$STARTUP:ESS$LAST_STARTUP.DAT
file as follows, along with any other changes necessary for your environment:
Remove the comment (!) character from the line that
has the following text: DEVICE = (). Within the parentheses, specify
the device name. For example: DEVICE = (EIA).
Comment out the line that specifies ALL_CONTROLLERS
= ON (comment out a line by inserting an exclamation point (!) at
the beginning of the line).
Optionally, add the following
two lines to the SYS$MANAGER:SYSTARTUP_VMS.COM system startup file:
NOTE: Invoke these commands manually to start these services immediately
rather than initiating a reboot.
Set up the BOOTP server and
TFTP server on the InfoServer server:
IMPORTANT: For HP SIM provisioning, the BOOTP and TFTP server
must be set up on the same system as the InfoServer. TFTP is required
on the boot server for supplying the boot files to the client systems.
Make
sure TCP/IP Services for OpenVMS is installed and that:
At least one IP interface is defined.
The BOOTP server and TFTP server are configured and
started.
Optionally, make sure TELNET and FTP are configured
and started.
To display IP interface
information, use the TCPIP SHOW INTERFACE command.
IMPORTANT: When you install or upgrade to OpenVMS Integrity servers Version
8.4 or later from an InfoServer through Provisioning, OpenVMS is booted
on the target server through a memory disk. So, you need not complete
steps b and c for OpenVMS Integrity servers Version 8.4 systems. Complete
steps b and c only for OpenVMS systems of version 8.3-1H1 and lower.
NOTE: If you are currently using the DHCP service, you
must disable it. The BOOTP service must be enabled instead. For
information about disabling or enabling services, see the HP TCP/IP Services for OpenVMS Management manual.
Set
up a location for the OpenVMS Integrity servers boot files by creating
the directory accessible by TFTP, as in the following example. HP
recommends that you create a separate boot file directory for each
version of the operating system.
$ CREATE/DIRECTORY
TCPIP$TFTP_ROOT:[V831H1]
IMPORTANT: For each subsequent upgrade of OpenVMS, you must
create a separate directory for the boot files specific to the OpenVMS
version and, where appropriate, modify the path specified for each
client’s boot files. To make subsequent upgrades easier, you
can use systemwide or clusterwide logical names.
Copy
the following two files from the DVD to the TCPIP$TFTP_ROOT:[V831H1]
directory:
[SYS0.SYSCOMMON.SYSEXE]VMS_LOADER.EFI
[SYS0.SYSCOMMON.SYSEXE]IPB.EXE
Gather
data for each boot client (each node that is going to be provisioned,
hereafter referred to as a provisioning/boot client), including the
IP address of the network device (the Integrity server core I/O card).
Define
each provisioning/boot client’s host name in the TCP/IP Services
for OpenVMS local host database using the TCPIP SET HOST command.
In the following example, hostname is the host name of the provisioning/boot client and ipaddress is its IP address:
$ TCPIP SET HOST hostname /ADDRESS=ipaddress
For
each provisioning/boot client, you might need to add an entry in the
BOOTP database to specify a gateway and network mask.
To do so, use the SET BOOTP command in the following format, where hostname specified the host name of the boot client, MACAddress specifies the MAC address of the network
port of the boot client used for LAN booting, gateways-ip specifies the gateways used for routing, ip-network-mask specifies the subnet mask, and diskname specifies either the DVD or LD device containing the OpenVMS OS
image
To determine the names of the gateways and the subnet information,
consult your network administrator. For more information on this
command, see the TCP/IP Services for OpenVMS documentation.
To display and verify your BOOTP server configuration,
use the TCPIP SHOW BOOTP/FULL command.
IMPORTANT: For each new version of OpenVMS Integrity server,
you must modify the client entry in the BOOTP database to point to
the new, version-specific boot file. As shown in the previous examples,
the boot file for OpenVMS Version 8.3–1H1 is [V831H1]VMS_LOADER.EFI and for Version 8.4 and later it is the actual path to VMS_LOADER
which is either in the DVD or the LD device created.
Create a copy of the OpenVMS
OE DVD on an LD device (logical disk or virtual drive) that is accessible
to the InfoServer utility. The following example shows how to establish
an LD device and copy the OpenVMS DVD (DNA0:) to the device on an
OpenVMS system that is the InfoServer server:
For more information about
InfoServer commands, including how to work with LD devices, see the
InfoServer help (at the InfoServer prompt, type HELP) or the HP OpenVMS System Management Utilities Reference
Manual.
Start the InfoServer client
on your Integrity servers, and on any other systems that are to be
provisioned, by entering the following command:
$ @SYS$STARTUP:ESS$STARTUP DISK
To have the InfoServer start at system boot, include
the preceding command in the SYS$MANAGER:SYSTARTUP_VMS.COM file.
Enable the LD device as the
InfoServer service, as in the following example:
If you want to use vMedia to provide a virtual CD/DVD
drive or image file over the network from which you can install or
upgrade OpenVMS on your Integrity servers, follow the steps described
in this section. These steps show you how to use iLO 2 MP through
your browser to create an ISO image of your OpenVMS OE DVD.
NOTE: Contents of screens shown in this section may vary according
to the type of browser software being used.
Insert the OpenVMS OE DVD
into the DVD drive on your PC or Windows server.
Make sure your Integrity servers
iLO 2 MP and vMedia are set up as documented in your Integrity server
hardware documentation (for example, see the HP Integrity
iLO 2 MP Operations Guide). Enable the right to use the
vMedia applet.
Make sure your Integrity
server is powered on. Once you connect to your server's iLO 2
MP and log in, you can check the status and power on your Integrity
servers from your browser. Select the Virtual Devices tab and access
the Power & Reset screen by selecting Power Management (on the
left of the screen).
From a browser on a Windows-based
PC or server in the same network as your Integrity servers, access
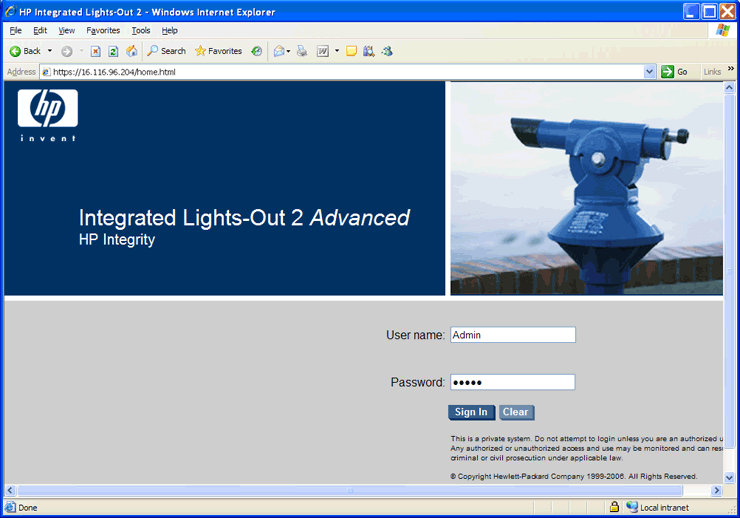
your Integrity server's iLO 2 MP by specifying the DNS name or
IP address. Then log in as shown in the following example (in this
example, the IP address is entered):
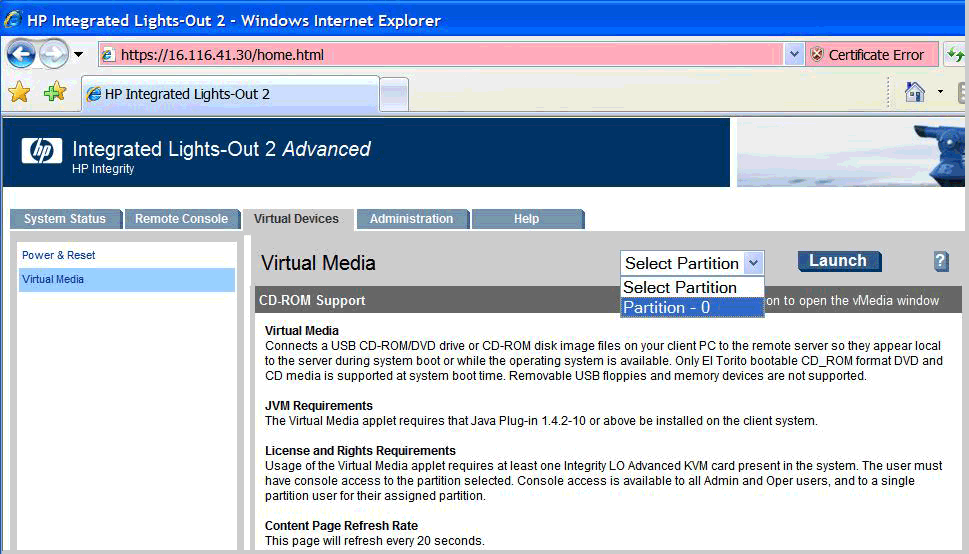
Select the
Virtual Devices tab and then select Virtual Media from the list on
the left. If your Integrity server is not a cell-based system, skip
to the next step. If your server is a cell-based system, you must
select the partition before launching the vMedia application, as in
the following example:
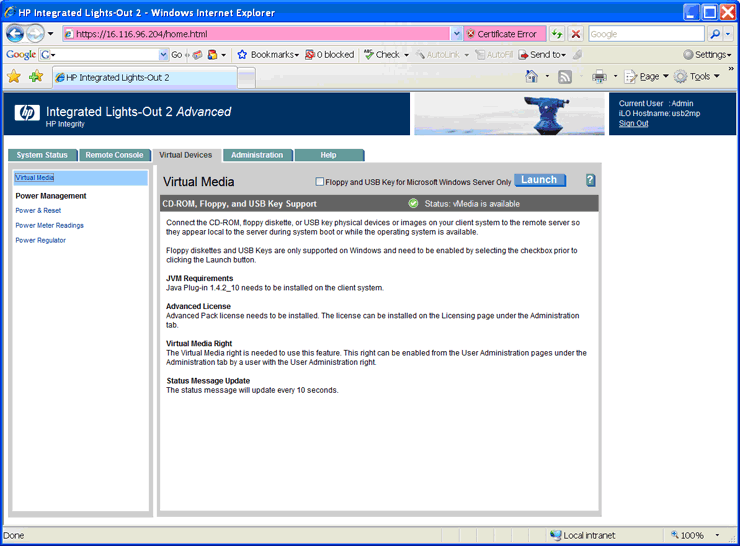
Click Launch in the upper right corner of the Virtual Media screen, as shown
in the following example:
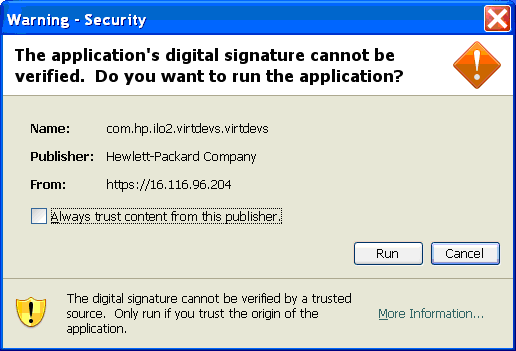
You might
see the following warning or similar warnings or informational messages
regarding security. In the security warning shown here, you can check
the box to always trust content, and then click Yes. (To avoid certification warnings, install valid certificates for
the iLO 2 MP. For more information, see the HP Integrity
iLO 2 MP Operations Guide. In addition, see the online
help provided by your browser.)
A screen similar to the following might appear
next. Check the box to always trust content, and then click Run.
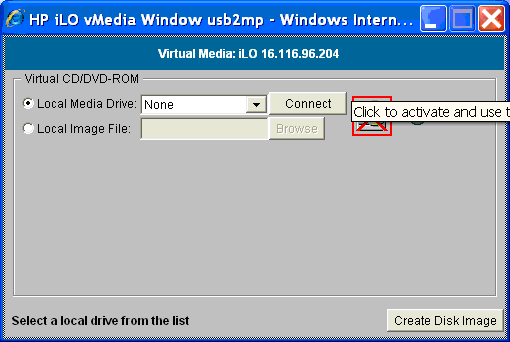
From the Virtual CD/DVD-ROM
dialog box that appears next, make sure the Local Media Drive option
is selected, and then click Create Disk Image, as
in the following example:
The Create Disk Image dialog
box appears, as in the following example. Specify a path or file name
for the image to be created, and then click Create.
NOTE: As noted previously, HP recommends that you do
not install or upgrade directly from a DVD (on your local Windows-based
management workstation) with vMedia. Creating a disk image on the
local drive (or a network drive) will make the installation or upgrade
much faster. This assumes the local or network drive is accessible
to your Integrity servers over a high-speed network link.
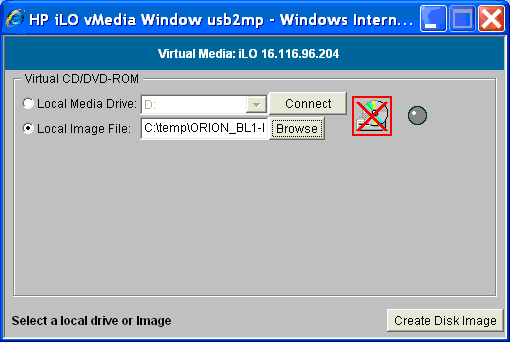
This brings up the Virtual
CD/DVD-ROM dialog box, as in the following example. Select the Local
Image File option, browse for the created ISO image file that you
want vMedia to access, and then click Connect.
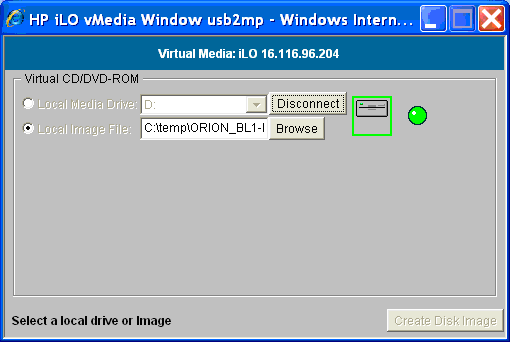
The screen should then indicate the image is connected
to vMedia, as in the following example. Now the targeted Integrity
server is ready to be booted using the ISO image file.
You can now provision OpenVMS through HP SIM (see Section D.1.6.2) or use vMedia
independently of HP SIM (see Section D.2.
D.1.5 Setting Up HP SIM and the Windows Server to Provision OpenVMS
Install and configure HP SIM on a Microsoft Windows ProLiant
server in the LAN according to the instructions in the HP SIM Windows Installation and Configuration Guide and
the HP SIM Release Notes available in the Information
Library on the following website:
Once HP SIM is installed and configured, do the
following:
Acquire and install the OpenVMS Provisioning Plug-in
for HP SIM, as described in Section D.1.5.1.
Enable HP SIM to discover and identify the MPs of
the Integrity servers on which you want OpenVMS provisioned, as described
in Section D.1.5.2.
D.1.5.1 Installing or Upgrading the OpenVMS Provisioning Plug-in for
HP SIM
The OpenVMS Provisioning
Plug-in for HP SIM enables HP SIM to support provisioning of OpenVMS.
Follow these steps to acquire and install the plug-in or upgrade an
existing version of the plug-in:
Download the HP OpenVMS Provisioning
kit (ZIP file) from the following website:
Extract the ZIP file to a
folder on your Windows server. Navigate to this folder, and double-click
the InstallOpenVMSProvisioning.jar file and click
the Install button on the resulting installer
wizard window. The OpenVMS Provisioning for HP SIM installation wizard
indicates the completion of the installation or upgrade of the provisioning
components and the update of HP SIM deployment tools.
NOTE: If you double-click on the .jar file and a Windows popup message indicates that Windows cannot open
the file, enter the following command at the MS-DOS prompt after changing
the current directory to the folder where the provisioning kit ZIP
file was extracted:
java -jar InstallOpenVMSProvisioning.jar
If your OpenVMS InfoServer
or vMedia is configured properly, you can use HP SIM to provision
(deploy) OpenVMS. However, first make sure HP SIM can discover and
identify the MPs of the Integrity servers that are to be provisioned.
D.1.5.2 Discovering and Identifying Your New Provisioning Client Management
Processors
On any Integrity server that is to be provisioned by HP SIM,
the iLO 2 MP must be connected to the network, and HP SIM must be
able to discover and identify the Management Processors (MP). For
information about connecting your iLO 2 MP, see the appropriate documentation
for Integrity servers.
You can configure HP SIM to automatically discover iLO 2 MP
ports in the network. But in some cases you might need to manually
discover a port that you have recently turned on. The procedure in
this section describes how to use HP SIM to discover a newly introduced
iLO 2 MP port. This is a one-time procedure. For more information
on using HP SIM, see the HP SIM User Guide.
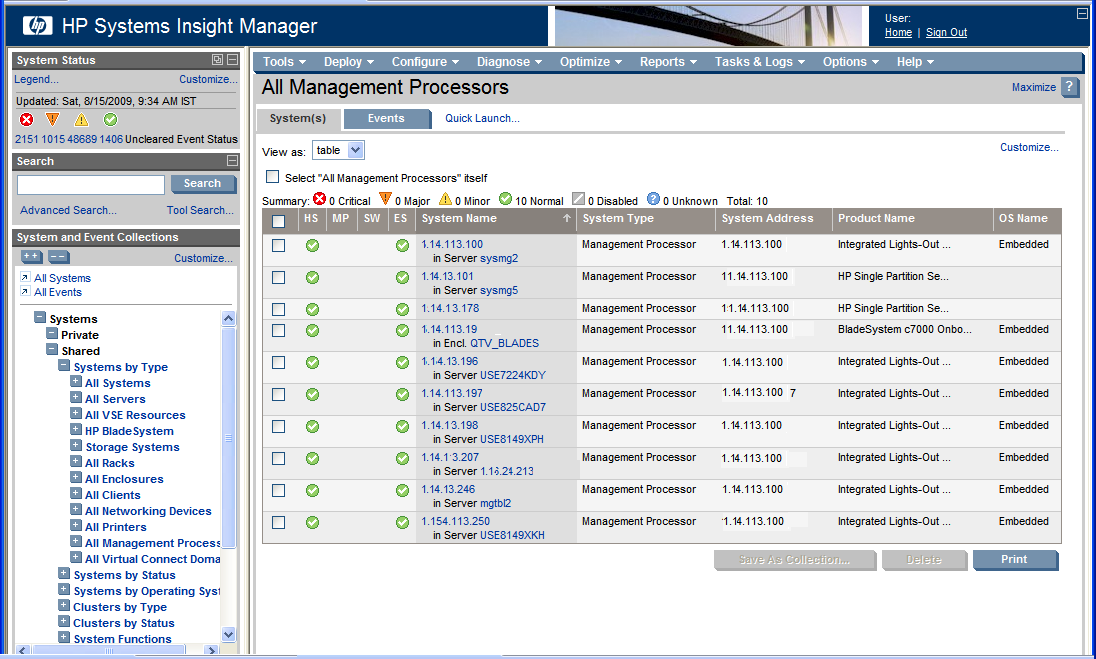
To determine whether your system iLO 2 MP has already been discovered,
access the HP SIM home page and select System and Event
Collections -> All Management Processors in the left-hand panel. The following is an example of an HP SIM All Management Processors listing.
If your system is listed with the proper port IP address and
identification, you are ready to provision. (HP SIM identifies such
properties as the type of system, which in this case is MP, the operating
system and version, and the product name.) If your MP is not listed,
perform a manual discovery as described in the subsequent sections.
NOTE: If your iLO 2 MP is connected properly and turned on, HP SIM
must discover it. If your port is not discovered, check the LAN cable
connections and proper port configuration. For more information on
these tasks, see the HP BladeSystem Onboard Administrator
User Guide or the HP Integrity iLO 2 MP Operations
Guide. For information on discovery problems related to
HP SIM, see the HP SIM documentation.
D.1.5.2.1 Manually Discovering an MP with HP SIM
To enable HP SIM to manually discover the Integrity servers
iLO 2 MP in HP SIM, use the following procedure:
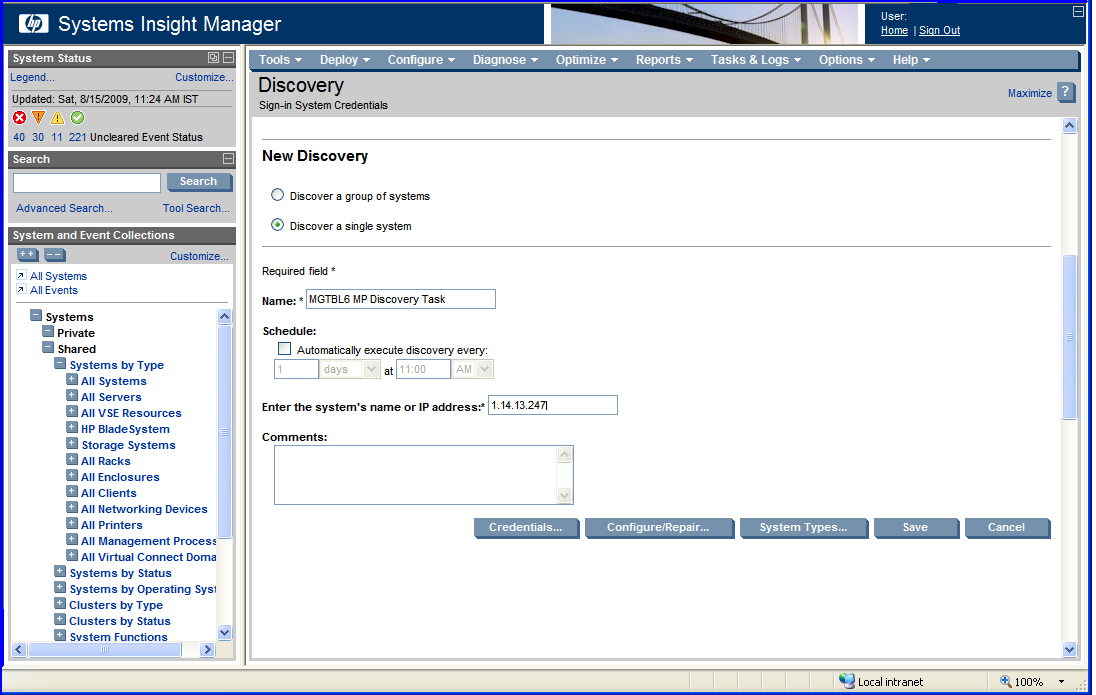
Select Options —> Discovery, as shown in the following example:
Click New.
Under
the resulting New Discovery heading, select Discover a single system. Enter the name of the discovery
task in the Name: text box. Under Schedule, clear
the Automatically execute discovery every check
box. Enter the IP address of the Integrity servers iLO 2 MP port to
be discovered, and click Save.
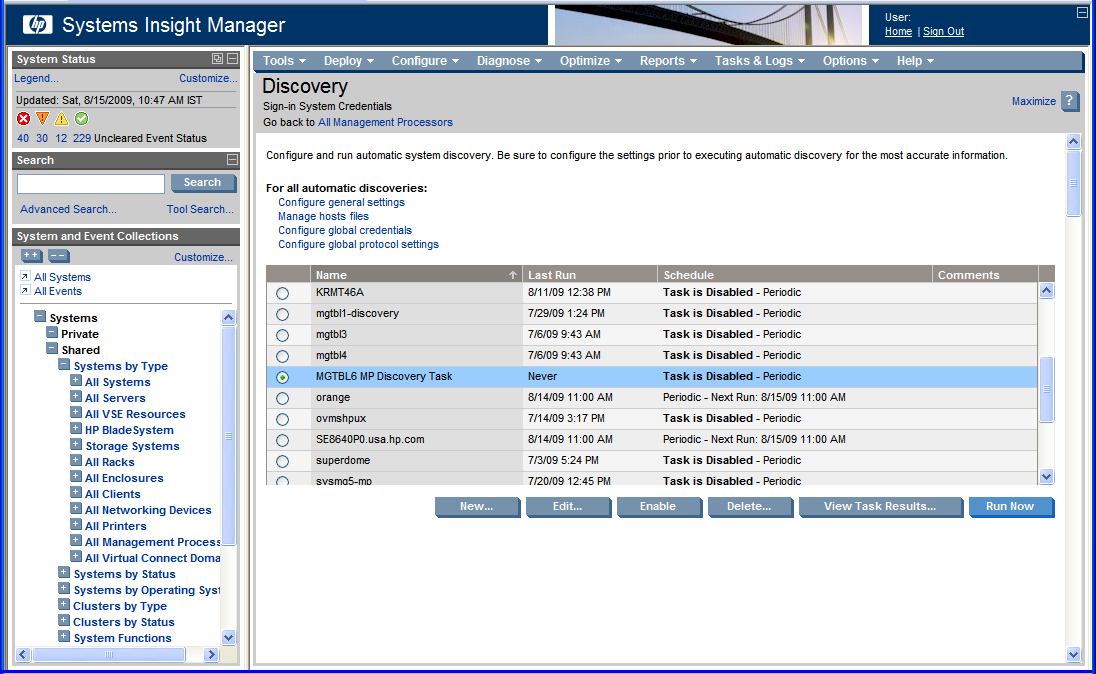
After the discovery task is saved, select the newly
created discovery task on the Discovery page and click Run Now. HP SIM will now attempt to discover the MP with
the given IP address.
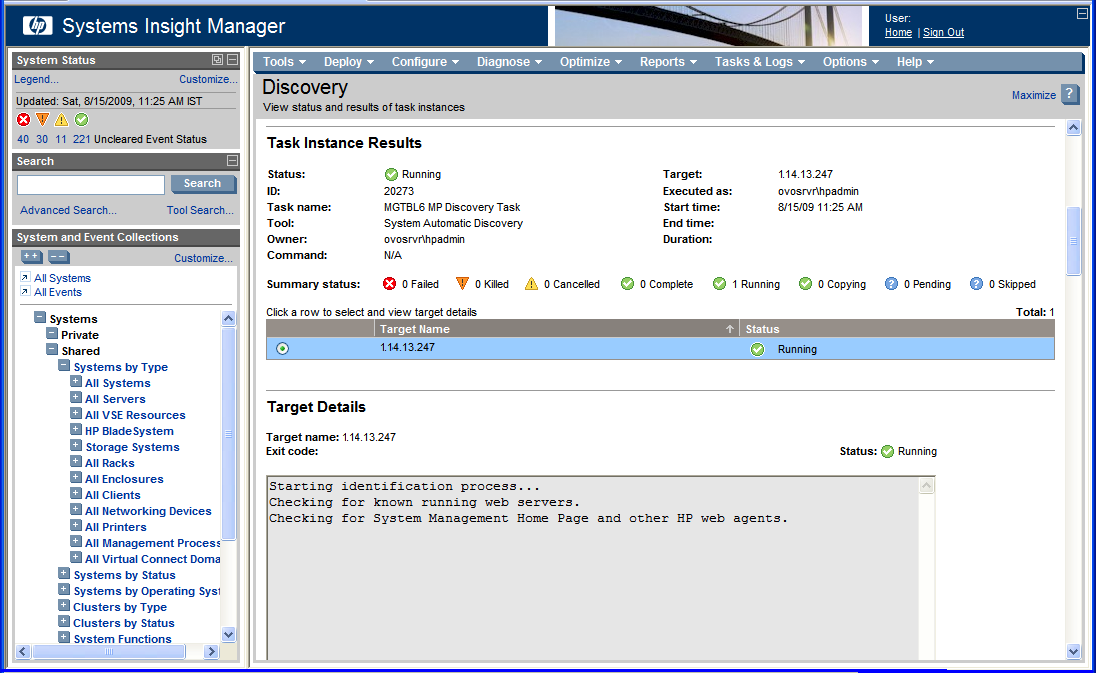
Click View Task Results to
view the progress of the discovery.
D.1.6 Provisioning OpenVMS
Once the iLO
2 MP of your Integrity servers (and any other servers you want to
provision) has been discovered and identified, you can provision OpenVMS
(deploy or configure the operating system on the target Integrity
servers).
Ensure that each server to be provisioned is not booted
into an operating system. The servers can be in a powered-OFF state,
in a halted state, or booted into the EFI shell. If a server is powered-OFF,
Provisioning will power ON the system before deploying OpenVMS.
IMPORTANT: Provisioning performs a system reset through the MP before deploying
OpenVMS on a server. If the server is booted into an OS, ensure that
the OS is gracefully shutdown before proceeding further with Provisioning
to avoid losing any unsaved data.
Ensure that the AutoBoot Timeout value for each server
to be provisioned is set to at least 5 seconds. This parameter can
be configured through the EFI Boot Manager menu (Boot Configuration -> AutoBoot Configuration -> Set
AutoBoot Timeout).
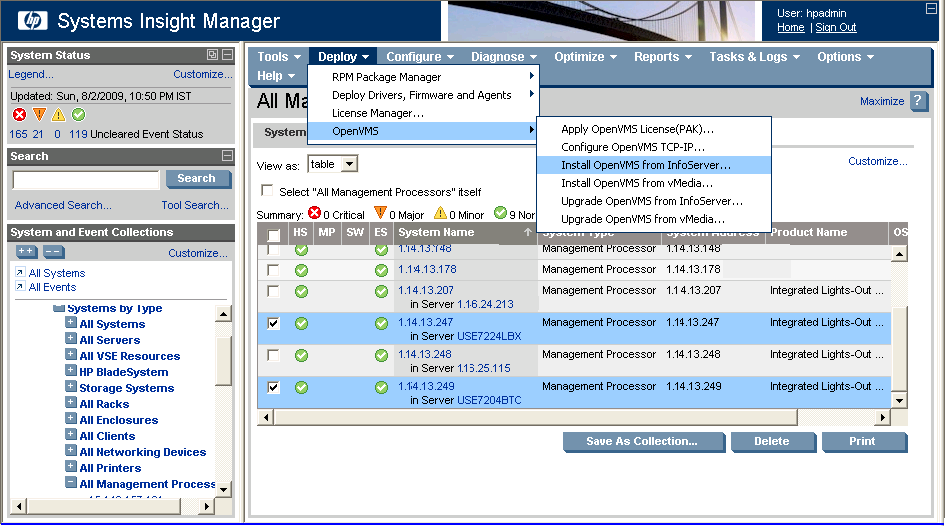
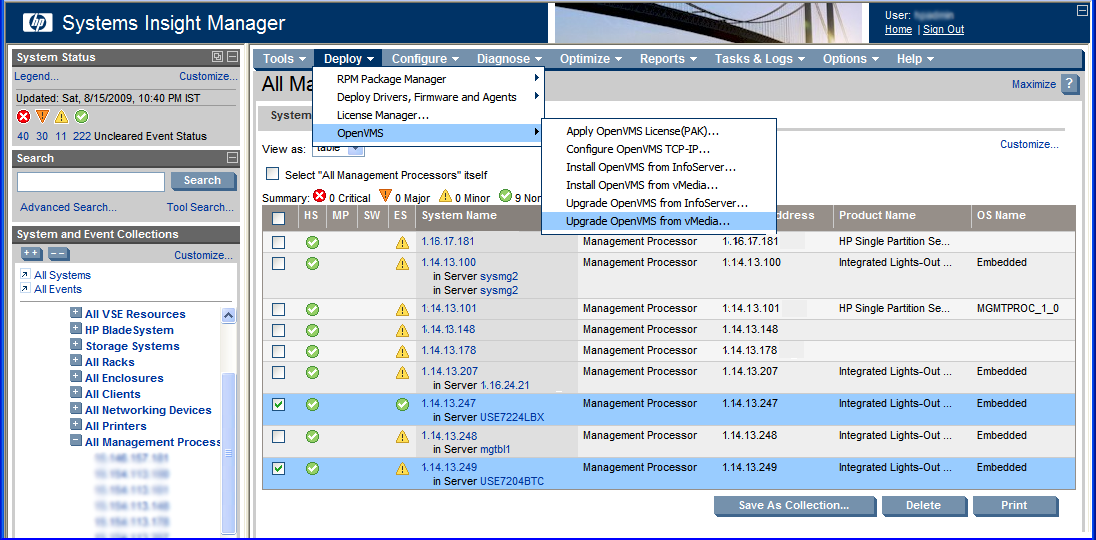
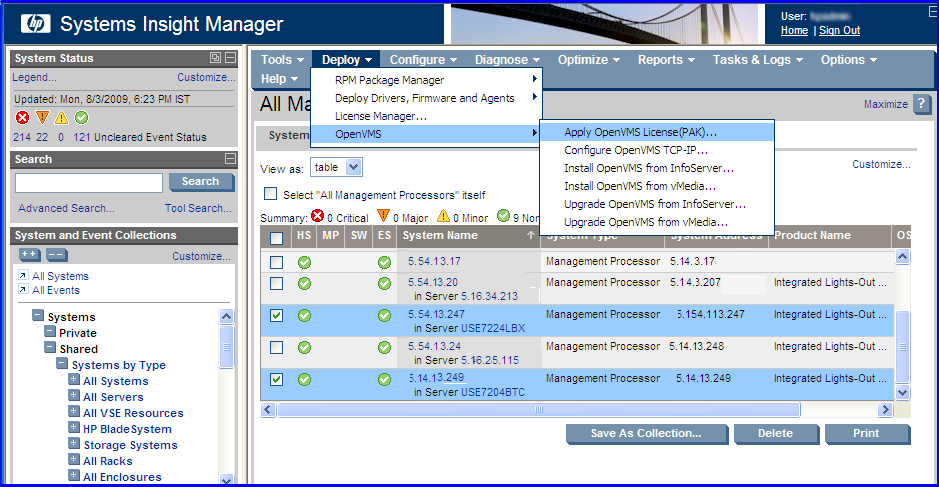
From the HP SIM home page, select System
and Event Collections -> All Management Processors.
Select the MPs of the Integrity servers to be provisioned.
Then, select Deploy -> OpenVMS, and select one of the following options from the OpenVMS menu:
Install OpenVMS from InfoServer
Upgrade OpenVMS from InfoServer
In this example, the option Install OpenVMS from InfoServer is selected.
NOTE: OpenVMS from InfoServer can be provisioned on up to eight servers
at a time.
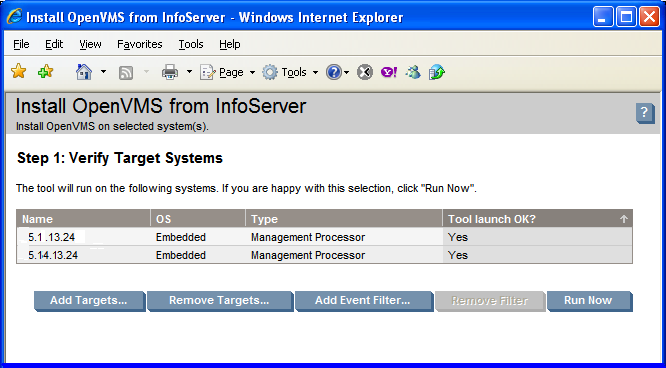
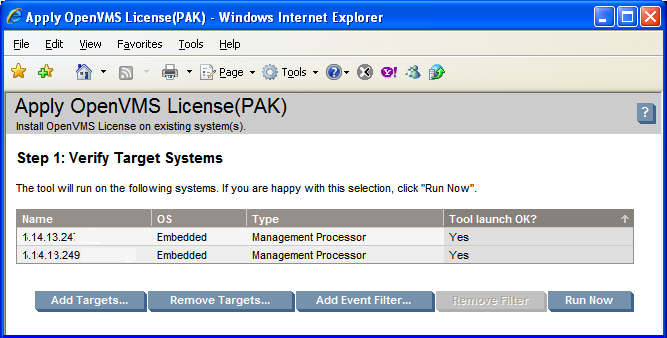
On the resulting page, HP SIM displays the Integrity
servers to be provisioned. Verify the target servers that you have
selected, and click Run Now.
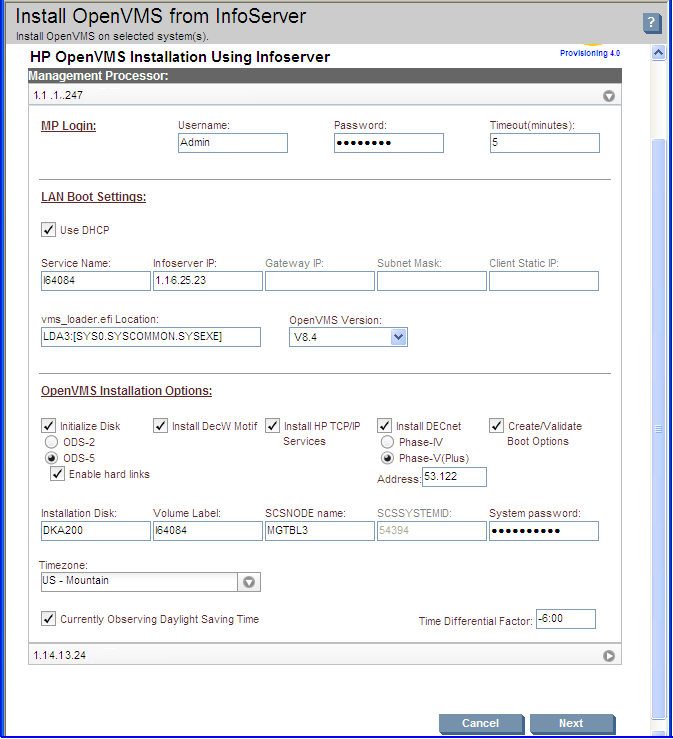
Provide the following information for each Integrity
server being provisioned:
MP Login Credentials: This information is used to login to the MP console of the target
server to provision OpenVMS. The default for the user name and password
is Admin.
Timeout (in minutes): This value determines the maximum duration of inactivity allowed
on the system console during OpenVMS installation or upgrade, after
which HP SIM provisioning reports that the system is not responding.
The default value of this parameter is set to five minutes. You can
modify this default value, but HP does not recommend decreasing the
value.
LAN Boot Settings:
Use DHCP: Select
this option if the target server must receive its TCP/IP settings
from a DHCP server for the LAN boot.
InfoServer IP and Service Name: InfoServer/BOOTP server IP address and InfoServer service name
that must be used for provisioning OpenVMS.
Client Static IP, Subnet Mask,
and Gateway IP: Specify these settings for the target server
if DHCP is not being used.
VMS_LOADER.EFI Location: Location of the VMS loader that must be used to network boot the
target server. For example, LDA3:[VMS$COMMON.SYSEXE]
OpenVMS version:
Version of OpenVMS being provisioned from InfoServer.
OpenVMS Installation Options:
Installation Disk: Device name of the system disk on which OpenVMS is installed. For
example, DKA200.
Volume Label: Volume
label assigned to the system disk. Ensure that the label name you
provide is unique. Problems could arise if the same label is used
for different disks. The volume label has a limit of 12 characters,
and can be a combination of letters (A to Z) and numbers (0 to 9),
and can include special characters such as the dollar sign ($), hyphen
(-), and underscore (_).
Initialize Disk:
Indicates whether or not the system disk will be initialized. Disk
structure to use if it is being initialized (ODS-2/ODS-5), and use
of hard links if the disk structure selected is ODS-5.
Installation of optional products: You can choose to install the following optional products with
the OpenVMS installation:
DECwindows Motif for OpenVMS
HP TCP/IP Services for OpenVMS
DECnet Phase IV or DECnet-Plus for OpenVMS
If you select DECnet Phase IV or DECnet-Plus for installation, you
must specify the DECnet address to be used. Enter the DECnet address
as 0.0 if you plan to use DECnet without Phase IV compatible addresses.
NOTE: WBEM Services for OpenVMS and WBEM Providers for OpenVMS are
automatically installed as part of the OpenVMS OS installation.
SCSNODE: Value of
the SCSNODE system parameter for OpenVMS on the
target server. The value must be a combination of least one letter
and numbers ranging from 1 to 6.
SCSSYSTEMID: Value
of the SCSSYSTEMID system parameter for OpenVMS
on the target server. If you have selected DECnet for installation
and provided a valid DECnet address, the SCSSYSTEMID parameter is automatically computed by provisioning based on the
DECnet address.
Create/Validate Boot Options: Select this option if you want OpenVMS to create a new boot option
when none exist for the selected system disk, or to validate an existing
boot option in the EFI Boot Manager boot options menu.
NOTE: If this option is enabled, and no boot option exists for the
selected system disk, Provisioning sets the VMS boot flags for the
new boot option as 0,0.
Time Zone Settings: Time zone in which the target server resides. Depending on the
time zone selected, you need to indicate whether daylight saving is
currently being observed and the time differential factor with respect
to the Coordinated Universal Time (UTC).
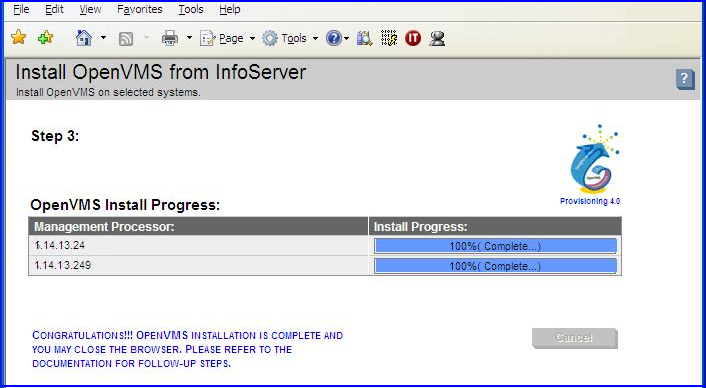
Verify the information provided for each target server and click Next.
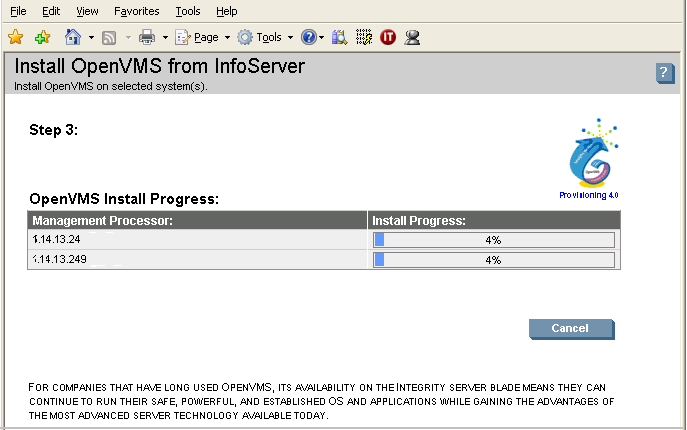
In Step 5, HP SIM LAN-boots the target servers, and
uses InfoServer to provision the selected version of OpenVMS on each
target server. The installation progress is indicated for each target
server, as shown in the example.
This image illustrates the progress of provisioning OpenVMS
from InfoServer.
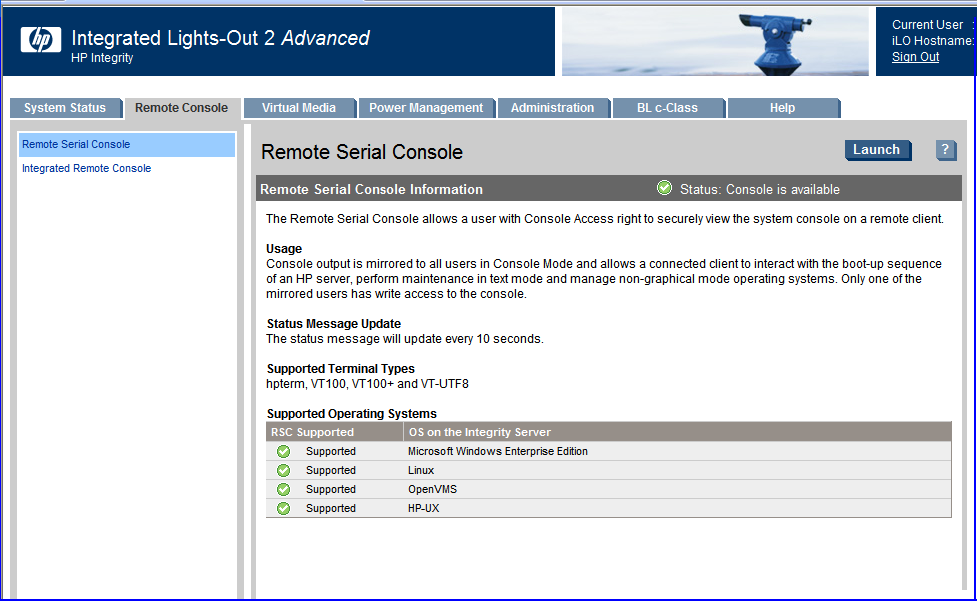
To view what is going on in the background for an
Integrity server that is being provisioned, access the server iLO
2 MP website address from any browser, as shown in the image below.
Click Launch to access the server serial console.
IMPORTANT:
Do not interrupt the installation process.
Do not allow Write access to the
server console while the installation or upgrade process is in progress.
This example shows the provisioning feature providing the InfoServer
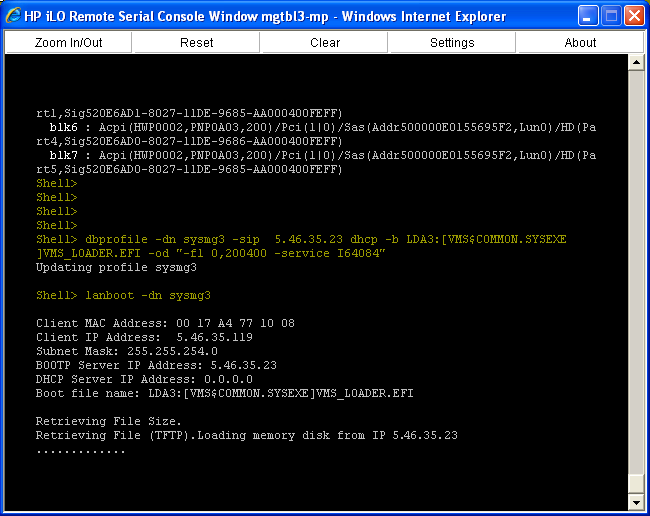
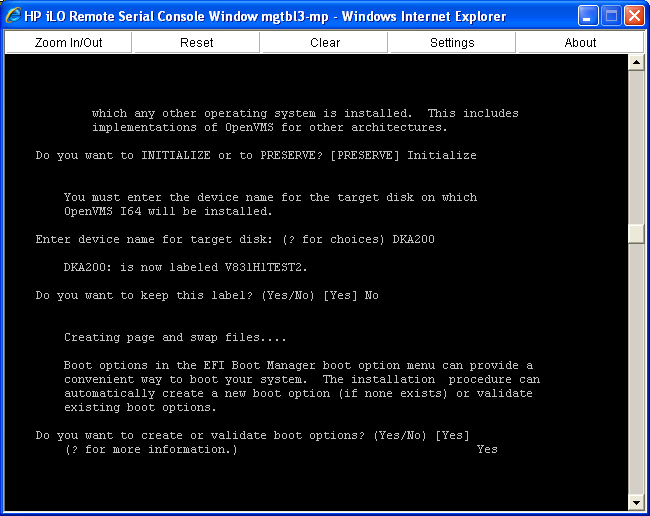
information and retrieving the system loader VMS_LOADER.EFI and other files needed to install OpenVMS.
The provisioning install script runs in the background and provides
responses to install OpenVMS on the target servers. The following
example shows some of the automatic responses from the install script.
IMPORTANT: Do not interrupt the process. Do not allow Write access to your server console while the installation or upgrade
process is in progress.
After approximately 60 minutes, depending on the network bandwidth
and configuration, the installation completes.
If the procedure does not complete successfully, provisioning
terminates. The reason for failure is displayed in the progress column
and on the console screen, as well as in the log file <HP
SIM Installation Directory>\logs\OPENVMS\<mp-ipaddress>_<date>.log on the ProLiant server that is running HP SIM.
NOTE: After completing the installation, you must register all licenses
for use of the operating system and any installed layered products.
For information about registering licenses, see “Registering Your Licenses”. For information
on using HP SIM provisioning to register your licenses, see “Installing Licenses on OpenVMS Servers Through Provisioning”.
D.1.6.2 Provisioning OpenVMS Through vMedia
To provision OpenVMS using HP SIM with the vMedia, follow these
steps:
Complete the procedure described in “Setting Up vMedia” to use vMedia
to present the OpenVMS OE DVD or DVD image to the Integrity servers
to be provisioned.
Ensure that each server to be provisioned is not booted
into an operating system. The servers can be in a powered-OFF state,
in a halted state, or booted into the EFI shell. If a server is powered-OFF,
Provisioning will power ON the system before deploying OpenVMS.
IMPORTANT: Provisioning performs a system reset through the MP before deploying
OpenVMS on a server. If the server is booted into an OS, ensure that
the OS is gracefully shutdown before proceeding further with Provisioning
to avoid losing any unsaved data.
Ensure that the AutoBoot Timeout value for each server
to be provisioned is set to at least 5 seconds. This parameter can
be configured through the EFI Boot Manager menu (Boot Configuration -> AutoBoot Configuration -> Set
AutoBoot Timeout).
From the HP SIM home page, select System
and Event Collections—> All Management
Processors.
Select the MP of the Integrity server to be provisioned.
Select Deploy —> OpenVMS, and choose one of the following options from the OpenVMS menu:
Install OpenVMS from vMedia
Upgrade OpenVMS from vMedia
In this example, the option Upgrade OpenVMS from vMedia is selected.
NOTE: OpenVMS from vMedia can be provisioned on one server at a time.
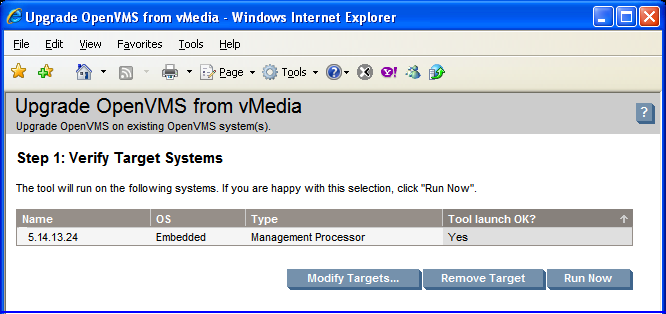
HP SIM displays the Integrity server to be provisioned.
Verify the target server that you have selected, and click Run Now.
Provide the following information for the Integrity
server being provisioned:
MP Login Credentials: This information is used to login to the MP console of the target
server to provision OpenVMS. The default for the user name and password
is Admin.
Timeout (in minutes): This value determines the maximum duration of inactivity allowed
on the system console during OpenVMS installation or upgrade, after
which HP SIM provisioning reports that the system is not responding.
The default value for vMedia provisioning is set to ten minutes. You
can modify this default value, but HP does not recommend decreasing
the value.
OpenVMS Upgrade Options:
Upgrade Disk: Device
name of the system disk containing a previous version of OpenVMS that
has to be upgraded. For example — DKA200.
Create/Validate Boot Options: Select this if you want OpenVMS to create a new boot option if
none exists for the selected system disk, or to validate an existing
boot option in the EFI Boot Manager boot options menu.
NOTE: If this option is enabled, and no boot option exists for the
selected system disk, Provisioning sets the VMS boot flags for the
new boot option as 0,0.
Verify that the information for the target server
is accurate, and click Next.
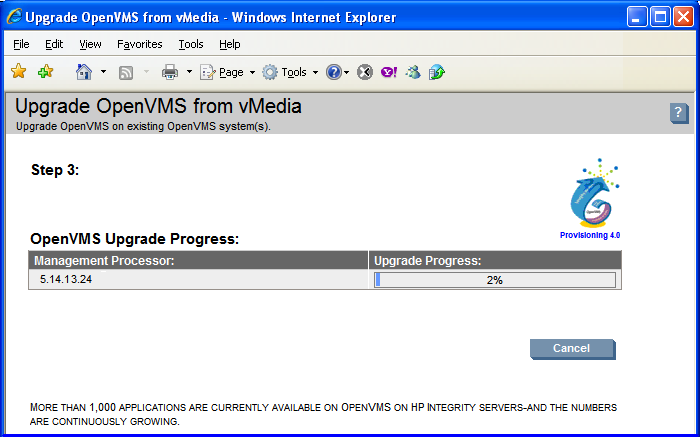
HP-SIM
boots OpenVMS from vMedia and provisions OpenVMS on the selected target
server. The upgrade progress is indicated, as shown in the example
below:
This image illustrates the progress of provisioning OpenVMS
from vMedia.
Meanwhile, to view what is going on in the background
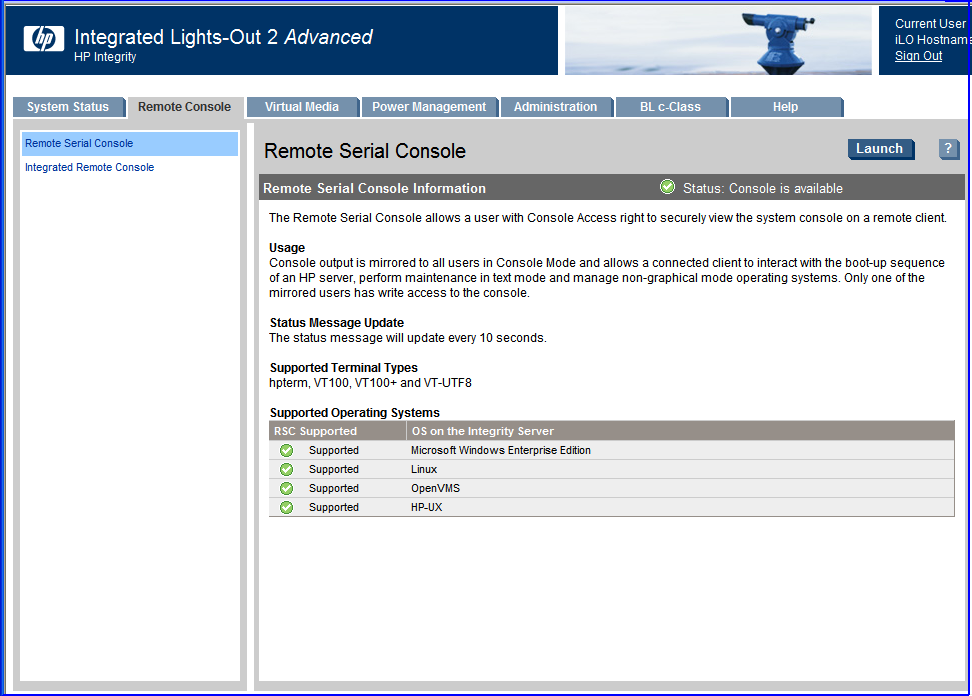
on the Integrity server that is being provisioned, access the server
iLO 2 MP website address from any browser. Click Launch to access the server serial console.
IMPORTANT: Do not interrupt the provisioning process. Do not allow Write access to your server console while the installation
or upgrade process is in progress.
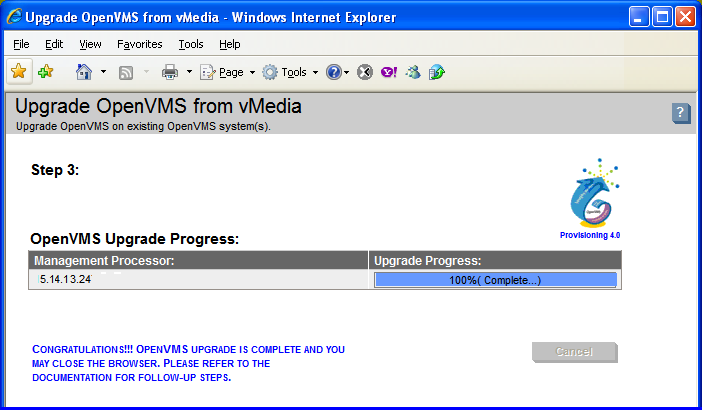
After approximately 90 minutes, depending on the network
bandwidth and configuration, the upgrade procedures is completed.
If the procedure does not complete successfully, provisioning
terminates. The reason for failure is displayed in the progress column
and on the console screen, as well as in the log file <HP
SIM Installation Directory>\logs\OPENVMS\<mp-ipaddress>_<date>.log on the ProLiant Server that is running HP SIM.
NOTE: After completing the installation, you must register all licenses
for use of the operating system and any installed layered products.
For information about registering licenses, see “Registering Your Licenses”. For information
on using HP SIM provisioning to register your licenses, see “Installing Licenses on OpenVMS Servers Through Provisioning”.
D.1.6.3 Installing Licenses on OpenVMS Servers Through Provisioning
You can use Provisioning to install licenses on Integrity servers
that are running OpenVMS. You will need the OpenVMS license PAK command
procedure for this purpose. Follow the steps below to install licenses:
From the HP SIM home page, select System
and Event Collections -> All Management Processors.
Select the MPs of the Integrity servers on which you
want to install the licenses.
You can install licenses on up to eight Integrity servers at
a time.
NOTE: To install the license, ensure that OpenVMS is up and running.
Before proceeding, verify that the correct installation of OpenVMS
is running on all the selected servers.
HP SIM displays the Integrity servers to be provisioned.
Verify the target servers that you have selected,
and click Run Now.
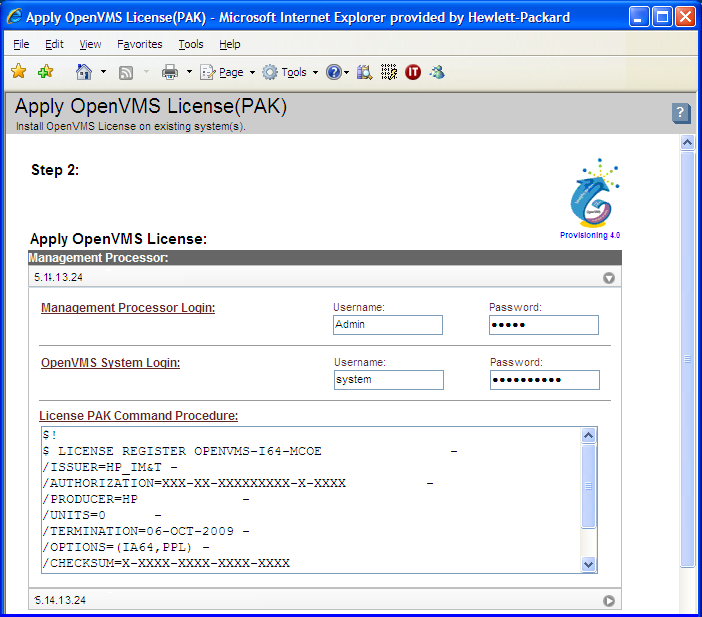
On the subsequent page, provide the following information
for each Integrity server that must be provisioned:
MP Login Credentials: This information is used to login to the MP console of the target
server to install licenses. The default for the user name and password
is Admin.
OpenVMS System Login Credentials: This information is used to login to OpenVMS that is running on
the target server to install licenses.
License PAK Command Procedure: Copy and paste the OpenVMS license PAK command procedure into this
text box.
Following is an example of all these values.
Verify the information provided for the target server and click Apply PAK.
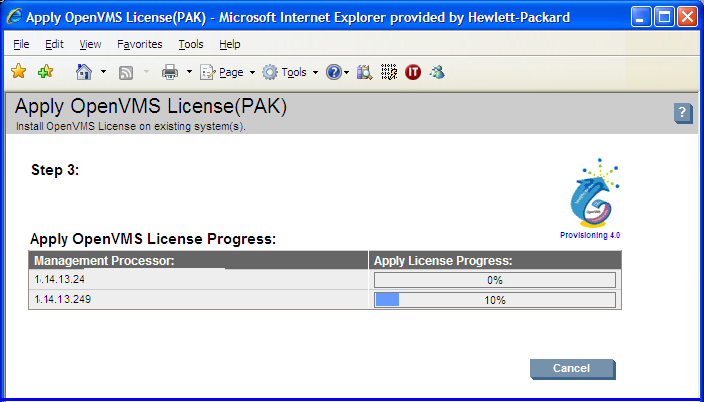
HP-SIM logs in to the MP console and OpenVMS on each
target server, and installs the provided licenses in the background.
The license installation progress is indicated, as shown in the example.
IMPORTANT: Do not interrupt the license installation process. Do not allow Write access to your server console while the license installation
is in progress.
The license installation process completes within a few minutes.
If the procedure does not complete successfully, provisioning
terminates. The reason for failure is displayed in the progress column
and on the console screen, as well as in the log file, <HP
SIM Installation Directory>\logs\OPENVMS\<mp-ipaddress>_<date>_License.log on the ProLiant server that is running HP SIM.
D.1.6.4 Configuring OpenVMS TCP/IP Through Provisioning
HP SIM Provisioning can be used to configure OpenVMS TCP/IP
on Integrity servers. Through provisioning, you can configure or re-configure
the TCP/IP core environment, client components and server components.
With provisioning, you can configure TCP/IP on up to eight Integrity
servers simultaneously and on each server, one network interface can
be configured.
NOTE:
Provisioning supports configuring TCP/IP with IPv4
addresses only; IPv6 addresses are currently not supported.
Provisioning does not support configuring an alias
or secondary IP address.
Provisioning does not support configuring the DHCP
server component on a target server.
Provisioning allows you to configure up to one network
interface on each target server.
Provisioning does not support configuring optional
components in HP TCP/IP Services for OpenVMS.
Provisioning does not support setting up logical LAN
devices and LAN failover configurations.
The subsequent sections describe the prerequisites and procedures
for configuring HP TCP/IP Services for OpenVMS with Provisioning.
D.1.6.4.1 Prerequisites for Configuring TCP/IP
Following are the prerequisites for configuring TCP/IP through
HP SIM provisioning:
The target server must have the correct installation
of OpenVMS up and running.
The HP TCP/IP Services for OpenVMS Version 5.6 or
higher must be installed on the target server. HP SIM provisioning
supports configuring HP TCP/IP Services for OpenVMS only. Configuration
of non-HP TCP/IP implementations is not supported.
The target server must have a valid license to use
HP TCP/IP Services for OpenVMS.
The target server must have at least one network interface
in the link-up state. Configuration of a TCP/IP
interface that is in a link-down state is not allowed.
On each server, up to one network interface can be configured.
To configure a target server as a DHCP client, the
DHCP server (serving client IP addresses) must be setup and running
on another system in the same network.
D.1.6.4.2 Configuring TCP/IP
Prior to configuring TCP/IP on the target Integrity servers,
ensure that the prerequisites are met.
IMPORTANT: Using Provisioning to re-configure TCP/IP on a target server
will delete any existing TCP/IP configuration on the server.
Complete the following procedure to configure TCP/IP:
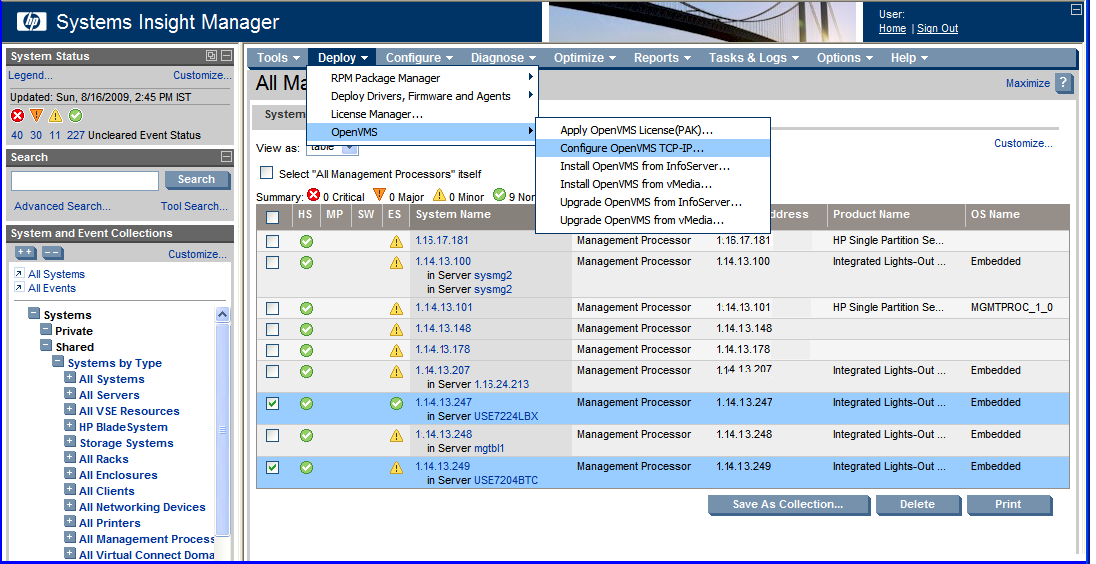
From the HP SIM home page, select System
and Event Collections -> All Management Processors.
Select the MPs of the Integrity servers on which you
need to configure TCP/IP.
HP SIM displays the Integrity servers to be provisioned.
You can configure TCP/IP on up to eight Integrity servers at
a time.
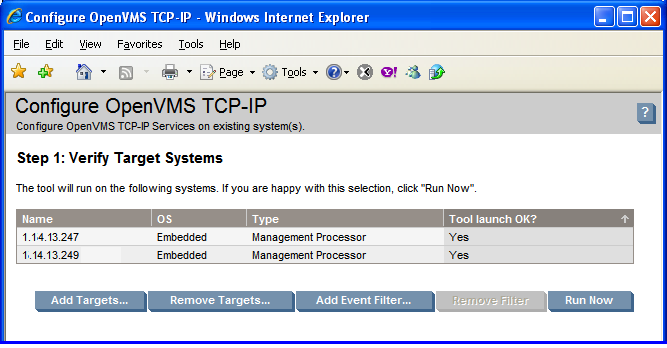
Verify the target servers that you have selected,
and click Run Now.
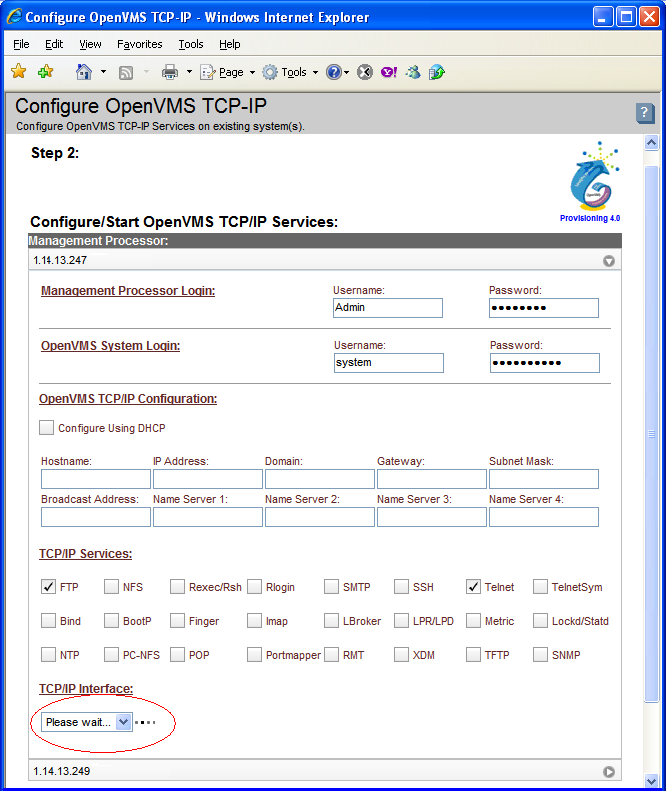
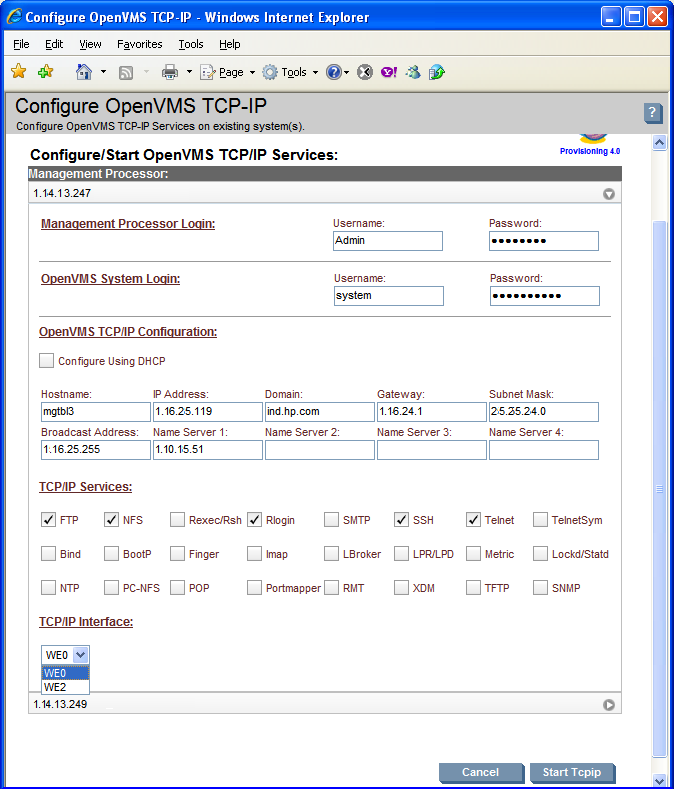
On the subsequent page, provide the following information
for each Integrity server being provisioned:
MP Login Credentials: This information is used to login to the MP console of the target
server to configure TCP/IP. The default values for the user name and
password is Admin.
OpenVMS System Login Credentials: This information is used to login to OpenVMS running on the target
server to configure TCP/IP.
After you have provided the MP login and OpenVMS system login
credentials for a server, and move the cursor focus away from the
credentials, provisioning automatically accesses the server and fetches
the TCP/IP network interfaces in the link-up state.
During this process, a message as shown in the figure below is displayed.
IMPORTANT: Do not interrupt the provisioning process. Do not allow Write access to your server console while this procedure
is in progress.
You can continue to fill out rest of the details for OpenVMS
TCP/IP Configuration and TCP/IP Services while provisioning fetches
the network interfaces in the background. After completion, provisioning
populates the TCP/IP Interfaces field in the GUI with the interfaces
found in the link-up state. You can select the
TCP/IP interface later, if required.
NOTE: If you accidentally specified incorrect credentials for MP login
and OpenVMS system login, and provisioning has started accessing the
target server, you can correct the credentials. Provisioning will
use the corrected credentials to access the target server.
If the TCP/IP interface fetch procedure does not complete successfully,
the reason for failure is displayed against the corresponding target
server (next to the TCP/IP Interface combo box) and in the log file <HP SIM Installation Directory>\logs\OPENVMS\<mp-ipaddress>_<date>_GetInterface.log on the ProLiant server that is running HP SIM.
Specify the OpenVMS TCP/IP configuration and TCP/IP
Services details for each target server.
OpenVMS TCP/IP Configuration: Specify the following TCP/IP configuration details for the selected
interface:
Hostname — TCP/IP host name for the target
server. When configuring the target server as a DHCP client, the host
name (if specified) is suggested to the DHCP server when acquiring
the DHCP address settings.
Configure using DHCP — Select this option if
the address configuration for the interface will be managed by DHCP
client. If not, the following information needs to be provided for
a static IP address configuration:
Interface IP address
Subnet mask
Gateway IP address
Domain suffix for the connection
Broadcast address: This address is automatically computed
from the interface IP address.
At least one and up to four name server IP addresses.
TCP/IP Services:
Select the client and server components to be enabled on the target
server. You must select at least one TCP/IP service for each target
server.
If the FTP, NFS, RLOGIN, SSH or TELNET services
are selected to be enabled, provisioning enables its client and server
components on the target server.
NOTE: If a target server is being configured as a DHCP client, the
services BIND, BOOTP, TFTP and XDM cannot be configured on the target
server. These services are disabled from the selection.
After provisioning has populated the TCP/IP Interface
details for each target server, select the network interface to which
the OpenVMS TCP/IP configuration that was specified in point 5 will
be applied.
Verify the information provided for each target server
and click Start Tcpip.
NOTE: The Start Tcpip button remains disabled
if the TCP/IP interface list cannot be successfully populated for
one or more target servers. For example, this button remains disabled
if incorrect MP or OpenVMS login credentials have been specified for
a target server.
HP SIM logs in to each target server, and configures TCP/IP
in the background.
IMPORTANT: Do not interrupt the configuration process. Do not allow Write access to your server console while the TCP/IP configuration
is in progress.
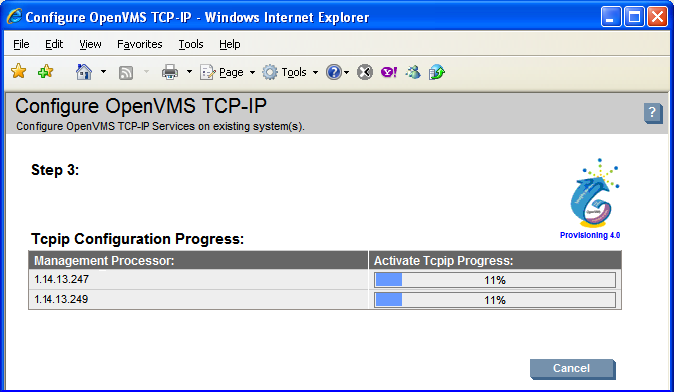
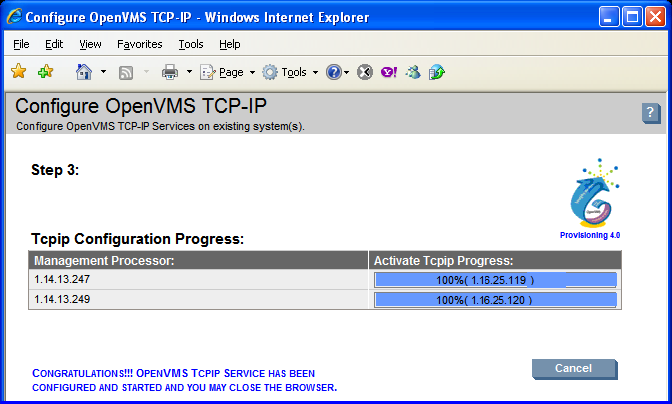
After configuring TCP/IP, provisioning starts the TCP/IP services
on each target server.
The TCP/IP configuration provisioning completes within a few
minutes.
If the procedure does not complete successfully, provisioning
terminates. The reason for failure is displayed in the progress column
and on the console screen, as well as in the log file <HPSIM-Installation-Directory>\logs\OPENVMS\<mp-ipaddress>_<date>_ConfigTcpip.log on the ProLiant server that is running HP SIM.
NOTE: To start TCP/IP services automatically after a system is restarted,
uncomment the following line in the COM procedure SYS$COMMON:[SYSMGR]SYSTARTUP_VMS.COM: